

I’ve been buying eBay lots of AS-IS clusters finding bits and bobs to assemble what I wanted.
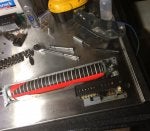
The real guts!
These are really marvellous things to work on, steel, brass, aluminium. They are not really so much delicate, but they do need a steady hand and decent eyesight, which my ageing eyes are failing at. Ultimately this one was rejected because the numbers on the odometer were too yellowed. A recent lot arrived with a roughly treated but otherwise internally great shape one AND low miles!

Here are a set of lenses from what appears to be a flood-damaged cluster. They’ll be saved but not used. (I just love the blue acrylic Volvo used for the High Beams!)
I spent several weeks going through the gauges, many didn’t work, a few were cosmetically damaged. A monetary test with a weak 9V battery let me find the ones that at least responded.
NEVER ever subject these bimetallic gauges to a full 12VDC, you are likely to damage them or even destroy them.
For these gauges to function they need several things.
1. A positive voltage source
2. A properly functioning voltage stabilizer that gives a 5.1VDC average (VDO supplied by a Voltage Stabilizer is PN 684623) . It will have an input, output and a ground. Important note, it MUST be grounded or it will not regulate.
3. A functioning gauge
4. A variable ground, such as the fuel tank sender or the temperature sender.
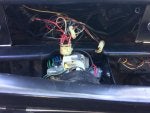
A quick test connecting up to my car gave good results! We’re going in the right direction.
I fully disassembled the plastic body (Sorry I didn’t photograph the process here).
The clear lens had its years of improper cleaning polished out with a muslin buffing wheel and jewellers rouge. The result was a near factory fresh sheen and clarity. The black body was scrubbed with a formaldehyde-melamine-sodium bisulfite copolymer sponge (Magic Eraser). A plastic nourisher called Island Girl was then applied and allowed to soak for 15 minutes, then aggressively wiped off with a WypAll. A thorough washing in very hot water and an aggressive buffing with another WypAll. A final application of 303 Aerospace Protectant. This was next set in the sun to fully dry.
The connectors were a mess, loose and oxidized. They were physically cleaned with a steel pick, chemically with DeOx-It, then the same pick was used to gently bend the connectors to tighten their grip.
The pins on the main board of the gauge cluster were also physically cleaned using a Dremel tool and a Dremel 538-02 Nylon Brush (abrasive impregnated nylon) In fact all available contacts were brightened.
LEDs were used where applicable (I did not use one for the AMP light (2721 bulb) since voltage needs to move both directions on this circuit and there is always some current so an LED would glow dimly.)
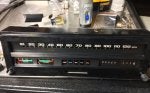
The completed refurbishment.
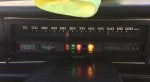
Installed! Yay! Now I have a temperature and gas gauge, all the lights work, I even have a dimmer, though I am still minus a knob for it.
One step at a time.
Eventually, I’ll get to the top.