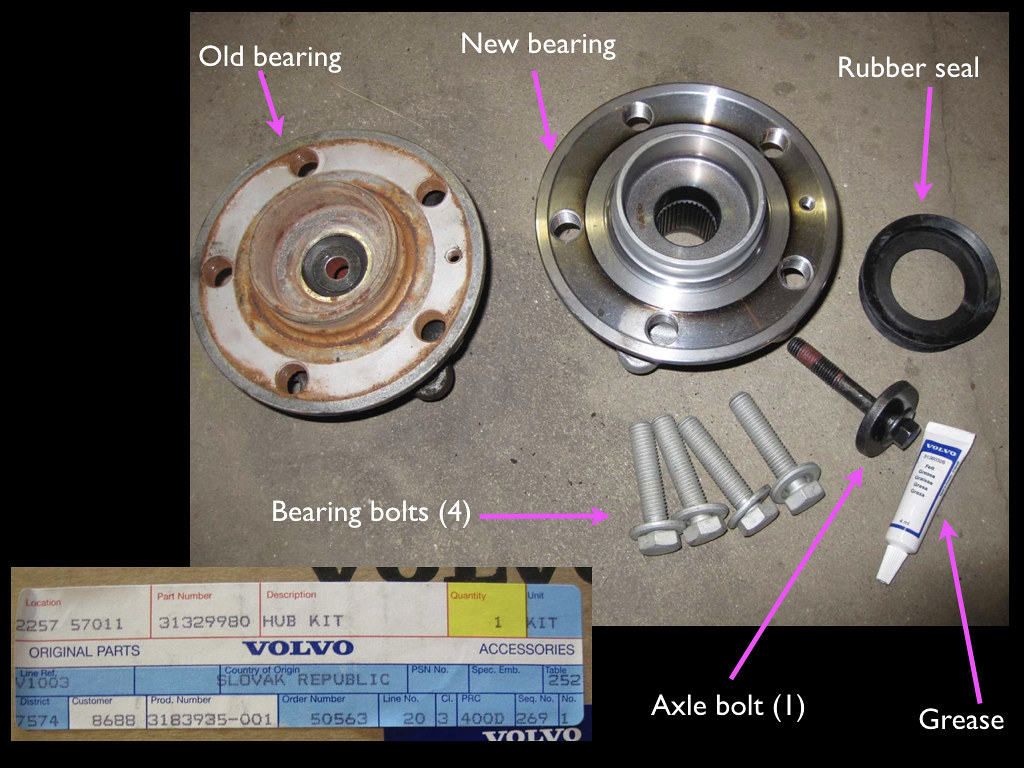
Recently, I had the distinct pleasure of changing the front left wheel bearing, and took some photos along the way. I pieced this together with some help of some other threads and my experience in changing the rear wheel bearings:
Well, here goes… Happy wrenching! It is rather rewarding to finish the job knowing the money saved by doing it yourself.
Part number 31329980 HUB KIT Contents:
-hub (bearing).
-4 bearing bolts.
-1 axle bolt.
-1 rubber seal.
-1 small tube grease.
001

Lift front of car off ground, either using jack stands or lift. Don’t work under the car supported only with a floor jack.
Remove front wheel.
Remove axle bolt
002

Remove front caliper (2 bolts).
003

004

If necessary, you may need to remove pad(s) before removing caliper.
005

Remove rotor splash/dust shield; 3 bolts. This is optional. I removed it to avoid damaging it.
006

Here are the outboard views of the 4 nuts to remove.
007

008

Soak bolts with PB Blaster, or your favorite penetrant. This is optional, depending on how “stuck” the bearing bolts. Amount of fluid and soak time will vary.
009

Inboard view of the bearing bolts to be removed. Notice the socket does not fit squarely on the bolt head. Therefore, axle needs to be removed from the bearing.
010

Loosen the lower ball joint nut. This is where an impact wrench would be VERY handy. However, I don’t have one, yet. So, to prevent the nut from spinning, I used knurled pliers to grip the outer diameter of the taper while loosening the nut with a socket. Or, use a ball joint separator (available for loan at auto parts store or a good friend).
011

Here is perhaps the most valuable trick. Use a ratcheting strap (I happen to have 1″ yellow straps) to pull the lower control arm out of the way. I connected the other end of the ratchet strap to the lower control arm on the other side of the car. You must crank on the strap pretty hard to pull the lower control arm out of the way.
012

Once lower ball joint separated, pull knuckle outboard direction to dislodge bearing from axle. Do not pull the axle outboard! If you pull it too much, a CV joint will separate. Notice the old, dirty axle? Or the grease on the subframe above? More on that later…
013

Handy tip #2. Use another ratchet strap (or similar) to pull and hold the knuckle outboard and rearward to allow easy access to bearing bolts.
014

015

Loosen the 4 bearing bolts.
016

017

Dislodge bearing from knuckle. Thankfully, mine popped out pretty easily with very little effort/force, unlike my rear bearings. I suggest starting with a rubber mallet, and working you way to more persuasive means, if necessary.
Remove rubber tapered washer from old bearing.
018

Reuse it with new bearing.
019

Install new rubber seal on end of axle. When removing old rubber seal, notice the difference of the two sides of the seal.
020

021

022

023
Clean inside of knuckle.

Grease inboard surface of new bearing. This grease will seal against the rubber seal you just replaced on end of axle.
024

Insert new bearing into knuckle. Install 4 new bolts. Notice the new, shiny axle? Yeah, more on that is coming…
025

Insert axle into bearing. Again, do not pull the axle outboard. Instead, push the knuckle/bearing inboard to fit over axle splines. Pulling the axle outboard risks separating one of the CV joints.
026

You may need to slightly rotate the axle and/or bearing to align the splines. When aligned, they will slide inside each other easily. Push the knuck/bearing inboard until the lower ball joint aligns with the tapered receiving hole in the lower control arm.
027

Install the lower control arm bolt.
Install new axle bolt.
028

Install brake splash shield and caliper.
Install wheel.
Viola!

