Chilled water piping insulation is not a typical system-to-be-commissioned listed in any RFP from a potential client, unless your client has been burned in the past by poor installation of such piping insulation. I have such a client, and representing their interests in a multi-year re-insulation project of failed chilled water piping insulation has instilled an appreciation for the importance of proper installation of such systems.
Several years ago, I was asked to weigh in on a dispute between the client and several insulation contractors. During the previous summer, the fiberglass chilled water piping insulation at the bottom of a riser had become saturated and started to drip onto the floor of the first-floor unit. This was a riser set that served fan coil units on each floor of the condominium. The saturated insulation was present where the riser pipes turned horizontal, high in the air of the first-floor unit which maintained an industrial aesthetic with exposed piping (See Figure 1).
Contractor A was first asked to address the dripping insulation. They replaced the horizontal section of piping with closed cell foam insulation. Dripping occurred again several weeks later where the new insulation butted up to the existing installation, at location A in Figure 1. Contractor B was then asked to address the issue. They incorrectly claimed the closed cell foam insulation Contractor A installed was not suitable for chilled water piping, thus, they reinsulated the horizontal section with fiberglass insulation as well as a portion vertical piping on the floor above.

Figure 1: Diagram of FCU riser which presented with dripping pipes in first-floor unit.
The client was not happy with either of the contractors. I was asked to weigh in on the dispute, as well as lead the effort to address the dripping once and for all. There were more than a few obstacles here:
- Neither contractor could tell me where the moisture was coming from.
- The riser piping was located behind hardened walls, which were behind laundry machines in the occupied condominiums above, making them difficult to investigate.
- It was winter and no drips had been witnessed for several months by the time I arrived.
- The existing insulation, installed by Contractor C, has been in place for nearly 17 years, but this was not the only riser that started having an issue with saturated insulation at its bottom the past summer. What had changed in the building to cause all the issues to occur at the same time?
A little investigation revealed there was pink dyed glycol in the chilled water system. Neither of the dueling contractors who were part of the repair efforts recalled seeing any pink in the removed insulation, which ruled out a chilled water piping leak. Additionally, no domestic piping ran anywhere near the riser in question. I hypothesized that the insulation must be compromised somewhere up the riser allowing for condensation to occur. Excessive condensation must have been saturating the piping insulation, and that moisture was pulled down by gravity toward the first floor. So much moisture must have got to the bottom that it either found its way out of the horizontal section of piping’s insulation sleeve, or the moisture reduced the insulative properties so much that water vapor from the air in the first floor unit condensed on the insulation’s cold exterior surface (see Figure 2). The homeowner’s association board asked me to lead a project to open the walls, identify the area(s) of compromised insulation, and repair. This was going to be a very disruptive and costly project, and I was mildly terrified my hypothesis would be proved wrong. But clearly something needed to be done, and this project would find the root cause of the issue one way or another.

Figure 2: Dripping insulation in the first-floor unit.
How It Went
The project entailed opening walls to gain access to the riser piping. We planned to start on 2nd floor and work our way up until we found a proverbial smoking gun: a compromised portion of insulation that was the conclusive source of moisture that was making its way down the riser. The existing insulation looked pretty nasty from the start (see Figure 3). We quickly had to engage an industrial hygienist to test both the surfaces of the insulation as well as air samples and advise on proper disposal.

Figure 3: Saturated insulation behind closed walls promoted excessive mold growth.
Due to the molds present, the industrial hygienist directed that all drywall penetrations and forthcoming removal of existing insulation was to be performed under negative pressure with HEPA filtration. As we worked our way up the riser, the state of the insulation got worse and worse, but no smoking gun. It wasn’t until the very top of the riser that we found uninsulated elbows (see Figure 4) at Location B in Figure 1.

Figure 4: Uninsulated elbows at top of the riser were source of condensation.
The re-insulation effort did not go great. I had asked the contractor to reinsulate with close cell foam insulation. During my inspection, I noticed a lot of techniques they used that looked sloppy, especially when it came to insulating through floor penetrations as well as at tee fittings leading to FCU branch piping, but they were working in very tight spaces and I was assured it was “industry standard.” We waited until the first real humid spell the following summer before closing up the walls. My concerns about their workmanship came back to haunt me as drips throughout the riser were found. For this contractor’s work to fail, after them being first-hand witnesses to the havoc a previous contractor’s poor installation had created for this building was very disheartening. Determined to hold them accountable, I read the insulation manufacturer’s installation manual from cover to cover, multiple times and I watched all the online videos on proper installation. And after numerous callbacks and rework, they finally got it to the point where I felt comfortable.
During one of these insulation contractor’s callbacks, I noticed the unit I was standing in was quite humid. The owner did not run her fan coil unit in the summer as she was quite energy conscious. The temperature in the room was 78°F, but more alarming was the dewpoint of 68°F. Where was all this moisture coming from? I quickly found the supply register from the building’s Dedicated Outdoor Air System (DOAS), which ducts conditioned outdoor air into each condo, was pushing in air at a state equal to the outdoor air conditions. A phone call to the servicing contractor revealed the DX cooling on the DOAS had gone out the previous summer. Essentially, the DOAS was just dumping unconditioned outdoor air into the building, and the only dehumidification capability was the in-unit fan coil units, none of which were sized for such latent cooling. The resultant, elevated dewpoints within the building was putting the poor initial insulation job to the test, and it was not passing, on multiple fronts. We now had a plausible answer as to why several of the buildings’ risers all started dripping the previous summer after never showing evidence of that previously.

Figure 5: Pipe alignment brackets used to square up branch FCU piping during installation were not removed prior to insulation. This creates a thermal bridge, which resulted in condensation formation right where the horizontal branch piping met the vertical riser piping.
How It Has Continued
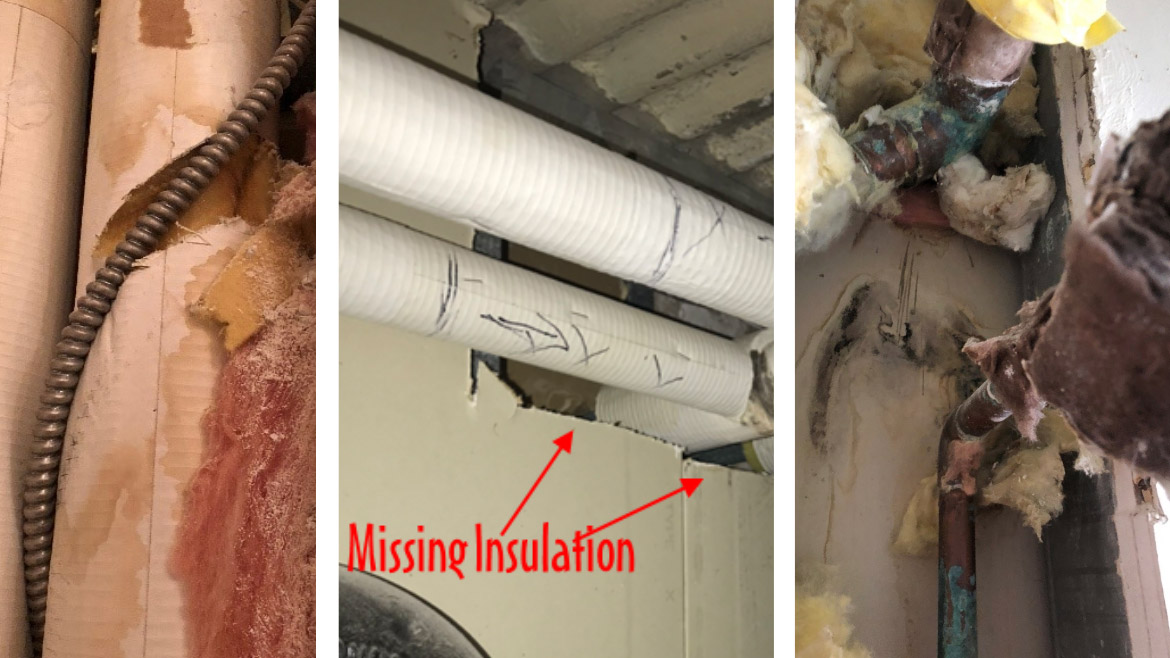
The eventual success of the riser reinsulating project prompted a study to see what other risers in the building needed to have repairs performed. The findings were extensive with numerous other risers dripping into other 1st floor units. An additional 5 phases of the project were planned, with each phase reinsulating one or more risers. To date, we have completed 4 phases of the project. Smoking guns were found in each of the risers reinsulated to date, see Figure 5 through 10 for some highlights.

Figures 6-8: To the left, a vapor barrier was compromised to make room for electric flex conduit in a tight wall cavity. In Figure 7, insulation is missing, and in 8, there is fiberglass insulation blanket used in lieu of piping insulation.
Commissioning Tips
Below is a list of a few tips I have learned when it comes to “commissioning” chilled water insulation systems.
- Know the installation guidelines. Becoming an expert on proper installation techniques takes mere hours and will better prepare you for installation reviews.
- Let there be no break in the vapor barrier and ensure continuous insulation, especially at wall and floor penetrations.
- Plan for insulation installation to occur when the pipes would not be sweating. This may mean offseason work or disabling a portion of the system and allowing water temperature to rise a bit to mitigate condensation during install.
- Observe critical junctures before access to such spaces becomes restricted (e.g. drywall is installed).
- Advocate for insulative tape to be over all longitudinal and transverse joints. Some manufacturers of close cell foam insulation have an integral tape closure that overlaps the longitudinal seam of the insulation. Splitting of joints is a primary cause of a compromised vapor barrier.
- Test the insulation by manipulating the system so there is adequate chilled water flow through the piping being tested. Allow this to occur for several hours prior to the next step, as to allow for any condensation that could occur to be formed. Then use an IR gun over every seam and joint. Proper insulation will have a surface temperature only a few degrees below space temperature. You will see a drastic drop in temperature of 10°F or more where comprised insulation is present. This technique is critical for tight spaces where you cannot view the insulation from every angle.

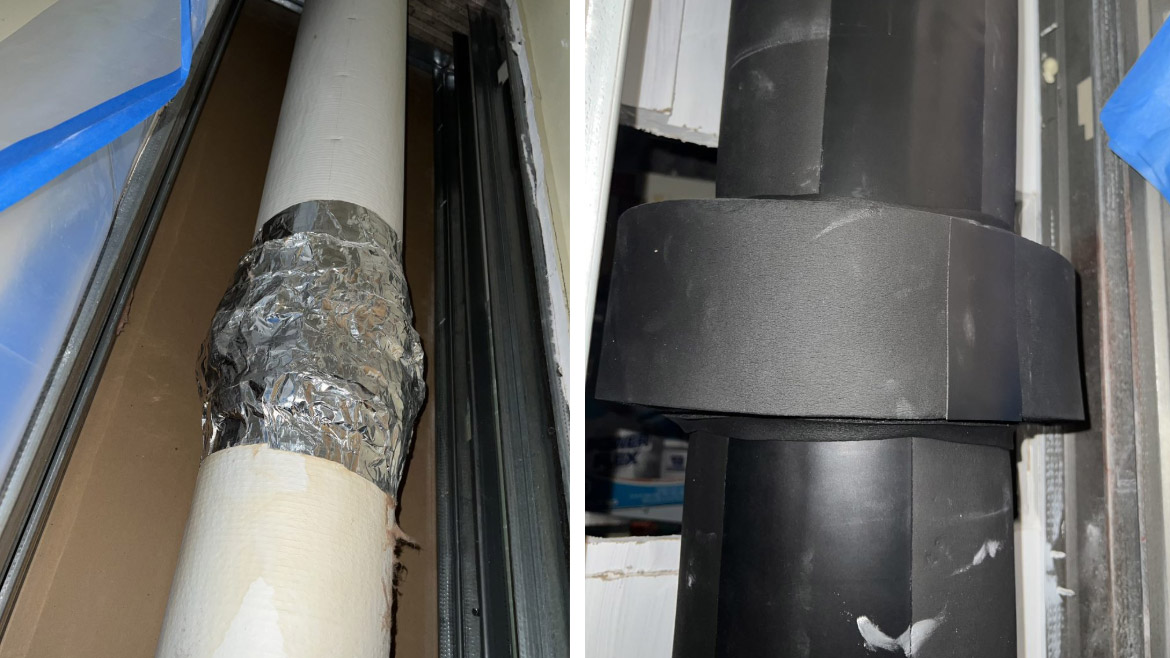
Figures 9: Inadequate insulation thickness and installation around piping coupling due to space limitations within wall cavity. Notice the water stain directly below it. To the right, replacement work, including bumping out drywall into a closet to allow for proper installation to occur around the coupling.
Conclusion
Aside from some calculations in my heat transfer class back in undergrad, I can’t say I ever put much thought into chilled water insulation systems prior to this experience. I would lie if I said I have enjoyed it, but I have learned a ton along the way, which has helped me on all the other projects where “chilled water piping insulation system” in not explicitly identified in the list of systems to be commissioned. And with each phase, I have gained confidence in my experience. I have been fortunate, after Phase 1 of the project, to have assembled a team of contractors who work very well together. We collaborate on how to address unforeseen issues, as some new obstacle presents itself every phase. These projects take place in people’s homes, can impact their health, and the residents are paying for it out of their own pockets. Members of the project team often remind ourselves that there is no room for error. We have to get this right for the residents we serve.

Figures 10: Continuous insulation through floor penetrations is vital. This is one of many examples where the initial contractor opted not to run continuous insulation through the floor penetration. Condensation was further exacerbated by exposed pipe clamps used to support the riser.

