The proprietary radio and amplifier cannot be replaced with the likes of Pioneer, Sony and Kenwood products. The OEM radio is an important part of the car’s computer system so it’s too complicated for an aftermarket manufacturer to clone. Furthermore the radio uses a digital optical harness to send signals to the amplifier that’s located under the passenger seat. That’s very unusual, especially when copper speaker wiring is so inexpensive and perfectly adequate. Optical connections complicate using an aftermarket amp, but I’ll show you how to do it.
The radio is the same in all four 2020 models (Momentum, Inscription, R-Design and Polestar). Only the speakers and amplifiers are different. You can buy the OEM amps and speakers (Harman-Kardon or Bowers & Wilkins) and swap them into your car but it’s expensive and the car’s software will require an update to make everything work together. It’s not practical even with used OEM equipment.
So, let’s upgrade the base speakers. The front doors contain three separate speakers: a tweeter, a 3.5″ mid-range and a 6.5″ woofer. The rear doors have a tweeter and a 6.5″ woofer. The base system does not have a sub-woofer.
I wanted crisper highs and more voice clarity so I shopped for a 3.5″ coaxial speaker for the front doors. I also wanted better bass. I like a little thump in the bass so I looked for an under the seat self contained sub-woofer. There are so many brands of good speakers available with so many good reviews from happy customers that it’s impossible to say what is THE best. So set a budget, read customer reviews, ask your friends and order whatever suits you.
My choices: a pair of new Kicker 43DSC3504 3.5″ co-axial speakers for the front doors and a used Rockville SS8P 8″ under seat sub. I could justify my choices but I won’t. Buy whatever you can afford and whatever will fit.


Installation
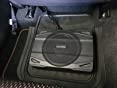
The sub is the easiest so I did it first and I didn’t take pictures. Sorry. I mounted the sub on the floor under the driver’s seat. The seat only has 4 bolts to remove and you can just tilt the seat back against the rear seat. No need to remove it from the car. Pick a spot for the sub and remember that you’ll want the controls (gain, bypass switches, the fuse, etc.) to be accessible after you replace the seat. Secure the amp to the floor but avoid screws that might puncture wiring under the carpet.
I slit the carpet with a utility knife and pushed two 1″x2″ lengths of furring strip under the carpet. I positioned the wood so that I could drive a short screw through the amps mounting tabs, through the carpet and into the wood. That will keep the sub in place but you may have a better idea. My amp is so heavy that I’m not worried about rattles.


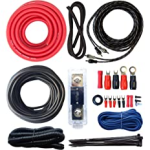
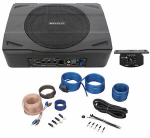
Connect the amp’s ground wire to any of the seat bolts. You can attach the positive wire directly to the battery’s positive terminal under the cargo floor. That wire can easily be hidden under the carpet and the trim molding at the door’s edge. There’s no need to remove trim molding because you can slide the wires into a hidden position. Follow your amp’s recommendation for wire size, attach insulated terminals to each end of your wires and use a wire loom covering. Amp kits like the one shown above will include everything you’ll need including a fuse holder that should be no more than 6″ from the positive connection to the battery.

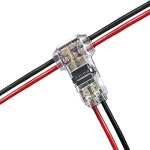
The powered sub that you pick should have line level inputs; this is very important. You cannot get a low voltage output from the Volvo amplifier so you’ll have to tap the amp’s output signal with suitcase connectors. I really like these because they tap two wires with one device.

Wire Connectors – Low Voltage T Tap Wire Connectors, 3 Way Wire Connector, T Type 2 Pin Solderless No Wire Stripping Required for LED Strip, Automotive Connection Fits 24-20 AWG 12 Pack – – Amazon.com
smile.amazon.com

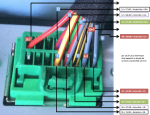
Move the front passenger seat as far forward as you can so that you can see the amplifier mounted under it. Looking at the amp from the back seat, remove the green connector on the right. It has a tab on one side that must be squeezed to remove it (see picture below). Each wire going into the green connector has a pin number. The thick red wire is in pin 16. The pin on the opposite corner to pin 16 is pin 1.

Tap into these four wires to get the line level signal that you’ll feed to your sub’s line level input.
Left Front speaker negative – Pin 1
Left Front speaker positive + Pin 9
Right Front speaker negative – Pin 3
Right Front positive + Pin 11
Tapping these wires will not have any effect on your stereo. Route the wires to the input on your sub’s amp and connect them to the high level inputon the sub.
That’s it. Follow the sub’s recommendation for setting the gain and remember that you can use the radio’s equalizer to adjust the bass to suit you. You should notice a big improvement in the bass but not enough to irritate your neighbors.
Notes: The Rockville sub will turn itself on and off as needed so it won’t drain your battery. If the sub’s amp makes a popping noise when it turns off then your ground wire isn’t tight. Many brands of subs have this on/off feature. The Rockville sub does not require a lot of amps so it doesn’t have to be wired directly to the battery. You could use the positive lead to the rear 12 volt outlet, but be warned….the console is a bear to remove.
I stole all the above pictures from other sites. Plagiarized pics are better than no pics, right?